Wildcat Game Studios Computer Science Modules
Welcome! Feel free to get started with one of our modules:
This website is currently maintained by:
- Benjamin Carey, Programming Director (bjca251@uky.edu)
Chapter 0: The Basics
This is the place for you if you're new to using your computer as a tool for writing software.The learning goals here are:
- using the command line to create, modify, move, and delete files,
- using the command line to traverse directories, and
- understanding some basic terminology for working with computers.
Chapter 1: Using Git
Git is a program that manages the versions of a project. It tracks changes between versions, tags them with metadata for future use, and serves as an extra form of documentation over a project. It's the most popular Version Control Software on the market, serving as the backbone for many open- and closed-source projects. Godot, the Linux Kernel, ReactJS, and many other popular projects use Git as their version tracker. We use it to track revisions of our projects and maintain concurrent development. In this tutorial, you will hopefully achieve these learning goals:
- to know what Git is,
- to create a Git repository, and
- to commit changes to this repository.
Throughout the course of this tutorial, we will be using a terminal console to
run git and gh (Github CLI) commands. If you need a refresher on using the
terminal, please see Chapter 0.
Let's get started.
Part 1.1: Installation
Installing Git is different between the different operating systems.
For Windows and MacOS:
Go to the git website and download the Git installer. This will open an installation wizard. Default values for all fields is acceptable. Note that for Windows users, you may need to add git to your PATH environment variable. If you need help with that or don't know what it means, please reach out to your Wildcat Game Studios CS team lead.
For Linux:
It is highly likely that Git is already installed on your computer. If not, use your favorite package manager to install it. You know what to do. ;-)
Part 1.2: Configuration
It's required to set your username and email. To do so, open a terminal and run these commands:
git config --global --add user.name <your name>
git config --global --add user.email <your email>
Replace <your name> and <your email> with your real-life name and prefered
email when typing the command in the prompt.
Side note:
You may want to set your default editor as well. When committing your changes,
you're required to give it a commit title and a description. The git program
automatically opens an editor from the command line when you do this. For Linux
machines the editor defaults to nano, an archaic editor with next to no
features. On Windows, failure to set the editor might lead to git crashing. To
set your editor, run the following command in the terminal:
git config --global --add core.editor <your editor>
Replace <your editor> with the file path to the editor you'd like to use when
making commit messages.
To review your configuration, run git config --list.
Part 1.3: Your First Project
Creating A Local Repository
To start your new project, create a new folder in your terminal to hold your project and initialize your git repository:
mkdir hello_git
cd hello_git
git init .
Note the . in the final command. When in the shell, . is an alias for the
directory (aka folder) you're in. The last command thus reads "initialize a git
repository in the current folder".
When you run this, you might get a message like:
hint: Using 'master' as the name for the initial branch. This default branch name
hint: is subject to change. To configure the initial branch name to use in all
hint: of your new repositories, which will suppress this warning, call:
hint:
hint:   git config --global init.defaultBranch <name>
hint:
hint: Names commonly chosen instead of 'master' are 'main', 'trunk' and
hint: 'development'. The just-created branch can be renamed via this command:
hint:
hint:   git branch -m <name>
Initialized empty Git repository in /home/ben/wgs/cs-modules/hello_git/.git/
This is normal and not anything to worry about.
Once your git repository is initialized, open the folder in any editor. For example, to open it in Visual Studio Code, run:
code .
(Note again the ..) Make sure to keep your terminal open as you make your
changes.
Side note:
In order for git to pick up any changes, there must be files that were either created, modified, deleted, or moved within the git repository. Creating a new folder (aka "directory") is not enough for git to pick it up. This is due to both design changes within git and because of historical Unix filesystem magic. Don't worry too much about it, just make sure to create a file for the sake of this tutorial.
Once finished, go back to your terminal and run:
git status
You should see something like:
On branch master

No commits yet

Untracked files:
  (use "git add <file>..." to include in what will be committed)
        sample.txt

nothing added to commit but untracked files present (use "git add" to track)
To commit the change to the repository, we first add it to the staging area:
git add .
We now see after running git status:
On branch master

No commits yet

Changes to be committed:
  (use "git rm --cached <file>..." to unstage)
        new file:   sample.txt
Now we will commit our changes:
git commit
Running the above command will open the editor you chose above. Once the editor is closed, the commit message is saved and this message appears:
[master 67ef172] initial commit
 1 file changed, 1 insertion(+)
 create mode 100644 sample.txt
The master is the name of your current branch. We'll cover branches
eventually.
Side note:
To skip opening an editor when committing small things, run the following
command instead of git commit:
git commit -m "<your message>"
where <your message> is your commit message.
Pushing to a Remote Repository
Side note:
Before continuing, go to github.com and create an account.
We will be using the Github command-line utility to create a repository online. To install it, go to the Github CLI repository.
You will also need to create a "Personal Access Token." This is like two-factor authentication, but you choose each permission someone has to your account when using the token. Follow this tutorial to set one up.
To create the repository, run:
gh repo create
When you see the first prompt, make sure to select Push an existing local repository to GitHub:
? What would you like to do?  [Use arrows to move, type to filter]
  Create a new repository on GitHub from scratch
  Create a new repository on GitHub from a template repository
> Push an existing local repository to GitHub
Continue with default options for the rest of the installation process. Note that, if it asks for you to input a password for your account, use your personal access token generated above instead of your account password.
1.4: How Git Works

(Image source: here)
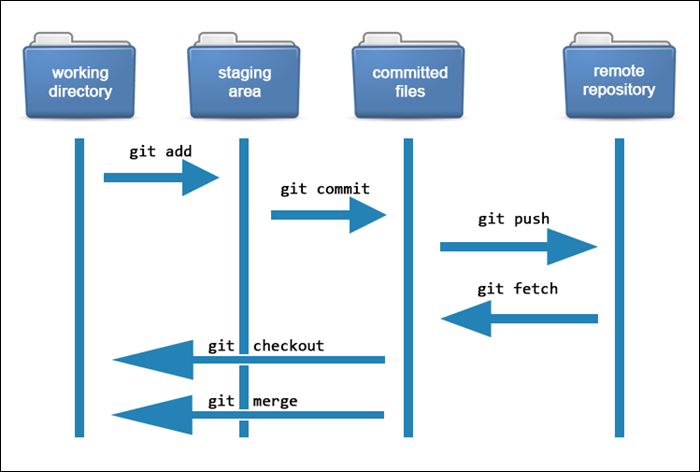
The git workflow involves four working areas:
- the working directory, which is just your files physically on your hard drive,
- the staging area, where changes are dedicated up for committing,
- the commited area, where changes are recorded in "commits", and
- the remote repository,
The Working Directory
This is where you modify files. You're familiar with this if you've stored project files on a computer before, such as a resume or a coding project for a class. Any files that you open, modify, save, and update using git will be done in the working directory.
The Staging Area
When you've made many changes to a project, you can cherry-pick which changes
to commit by "staging" them. This was done above when you ran git add ..
The Committed Area
When you run git commit, all changes in the staging area are collected into a
single commit object. A commit is like a version of your repository. The commit
itself holds the changes between the previous version and the current version
of the repository. These changes are represented in a diff file that may look
something like this:
diff --git a/sample.txt b/sample.txt
index 92de390..420fb34 100644
--- a/sample.txt
+++ b/sample.txt
@@ -1,2 +1,4 @@
-Hey there, this is a new git repository!
+Hey there, this is a new modified git repository!
+
+This is an additional change.
To see this diff in your own project, run the following command
git diff HEAD~1
HEAD is the name of the latest commit in your local committed area, and ~1
means "get the diff since the last commit". You could also use HEAD~3 to git
the difference since the third-to-last commit, etc.
The Remote Repository
This is the host of your project that is shared with other developers. When you created the remote target on GitHub, you created the remote repository.
1.5: Final Remarks
Once you have finished creating your first repository, follow these steps to show you understand the content in this module:
- Create a new file in your repository and add a few of your favorite things into it.
- Check that file into the staging area (hint: either use
git add .orgit add <your file>). - Commit what you've checked in and push it to your new repository using
git push. - Copy the URL of the repository you created and send it to the current Wildcat Game Studios CS lead.
Chapter 2: Godot Beginnings
Us programmers have the important role of creating Game Objects, or "toys", for the game designers to play with. In this tutorial we will make a simple toy and demonstrate how to play with it in the Godot editor.
Please watch this. The content contained within will be used for the next module as well. This will cover all the material we will use for working with Godot in WGS.
If you haven't already installed Godot, you can do that here.
2.1: What to turn in:
The next tutorial will have you creating a 2D platformer. To complete this module, create a new node that's controlled by the arrow keys on your keyboard. The simplest way to do this would be duplicating the node we just created while only changing the script we made. Then, change the behavior of the new player somehow (maybe it could speed up the longer you hold the movement down, or it could gradually accelerate instead of immediately moving and then stop accelerating once a target speed is hit.) Whatever you do, explain its behavior somewhere in your submission.
The preferred method for submitting this project would be creating a git repository for what you create (or reusing an old one) and hosting it on github. You can then send the Programming director the link to the github page. Using Github would allow for pull requests and issues which would optimize feedback. Alternatively, you can email the current Programming director a zip file containing your project. You can find the email for the current director in the home page.